- Get link
- X
- Other Apps
This is almost too simple to describe it in a blog post, but I haven't found any mentions of someone making such a battery pack online, so here goes:
People seem to be obsessed with building battery packs out of 18650 cells, but the recipe inevitably involves some kind of a spot welder to weld nickel strips between battery terminals.
Spot welder in question is generally of a homemade variety: either a microwave transformer retrofitted with a new primary, or simple assemblies with supercapacitors/lead-acid batteries and hight current relays.
The truth is, you'd only need a weld between battery terminals if you wanted to to squeeze pretty high currents out of this pack. But high power density is not all that battery packs are put together for!
What I'm describing here is a battery pack that:

This is the schematic you want to solder the connections according to:

Step 1: Solder the cases together, positive terminal always connecting to negative terminal on the other battery.

Step 2: Solder positive and negative wires to outermost terminals (that don't have anything soldered to them yet). Mind the polarity on the balancing connector! Mind the way it's facing on the picture below, and connect the terminals accordingly (your wires might be colored differently).
You can also solder the cables for the power connector.
Step 3: Add the central balancing wires. Again, pay close attention to their order. Look at the pictures to get the idea which wire goes where.

Step 4: Finish the power connector. Make sure to conceal the exposed terminals in some shrink tube.

And that's it!
Step 5: Check that the pack is working correctly. Try to charge/discharge it, with balancing connector plugged if your charger supports it.

Step 6 (Optional): I had to make a matching connector (XT-30 male) for my charger, you'll probably want to do that to.

Step 7: Apply copious amounts of electric tape (haha). Seriously, come up with something more attractive to insulate all exposed wires on the pack.

People seem to be obsessed with building battery packs out of 18650 cells, but the recipe inevitably involves some kind of a spot welder to weld nickel strips between battery terminals.
Spot welder in question is generally of a homemade variety: either a microwave transformer retrofitted with a new primary, or simple assemblies with supercapacitors/lead-acid batteries and hight current relays.
The truth is, you'd only need a weld between battery terminals if you wanted to to squeeze pretty high currents out of this pack. But high power density is not all that battery packs are put together for!
What I'm describing here is a battery pack that:
- Can accommodate any number of 18650 batteries. In other words, it's extensible.
- Is only good for low currents - no more than a couple of amps is all I'd recommend putting through it.
- Does not require spot welder of any kind - you only need a regular soldering iron.
Detailed pictorial
You'll need:- Several 18650 batteries, a matching number of holders for these. It's preferable if you source batteries that were used together (e.g. all from the same powerbank).
- JST connector with N+1 pins, where N is how much lithium cells you got. This is going to be used by chargers that support cell balancing.
- Power connector for battery: typical choice is XT-60 but it's a tad too big for the kinds of currents we'll pull, so I got myself XT-30 instead.

This is the schematic you want to solder the connections according to:

Step 1: Solder the cases together, positive terminal always connecting to negative terminal on the other battery.

Step 2: Solder positive and negative wires to outermost terminals (that don't have anything soldered to them yet). Mind the polarity on the balancing connector! Mind the way it's facing on the picture below, and connect the terminals accordingly (your wires might be colored differently).
You can also solder the cables for the power connector.


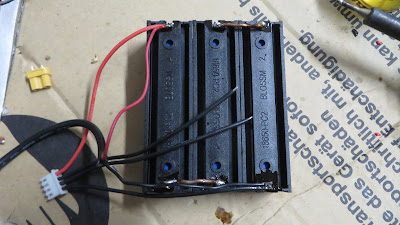
Step 4: Finish the power connector. Make sure to conceal the exposed terminals in some shrink tube.

And that's it!

|

|
| (Functionally) finished product. | |

Step 6 (Optional): I had to make a matching connector (XT-30 male) for my charger, you'll probably want to do that to.

Step 7: Apply copious amounts of electric tape (haha). Seriously, come up with something more attractive to insulate all exposed wires on the pack.

Comments
Post a Comment