- Get link
- X
- Other Apps
I've recently bought one of these displays for Raspberry Pi that you can get at cutthroat prices (about 25 USD at the time I'm writing this). [link]
Display in question is usually listed as "5 inch LCD HDMI Touch Screen Display TFT 800*480" in various arrangements. Not 100% sure about relations between them, but most of the cheap units looking like pictures above seem to be clones of Waveshare 5inch HDMI LCD (B). The one I got was from a company called SpotPear [link].
The catch is, manufacturer promises that this display is directly supported on Raspberry Pi (actually, Raspberry Pi 2 and later because of the location of HDMI connector), but the only single-board computer I had at hand was BeagleBone Black.
Well, I thought, judging by the look of it, the display receives its feed over HDMI, and I don't really want touchscreen capability, so how hard can it be?
Things to be aware of:
Some helpful resources on the display:
Quite simple, isn't it? Actually, you'll need to make some more connections to make touchscreen work:
Note that we're just powering the display via micro USB, therefore you can hook it to any other 5V power supply (e.g. another wall charger) if you're saving USB host connector on BBB for later. If this other power supply happens to be isolated from main BBB power source, make sure to join the ground terminals as shown in table above.
2) Power up the board, while holding down the "Boot" button:

You can release it when all 4 LEDs lit up. Now you've essentially told BeagleBone to boot from memory card instead of eMMC memory, up until power cycle (and only that! When you press "Reset" button it will still boot from SD, whether you hold "Boot" button again or not).
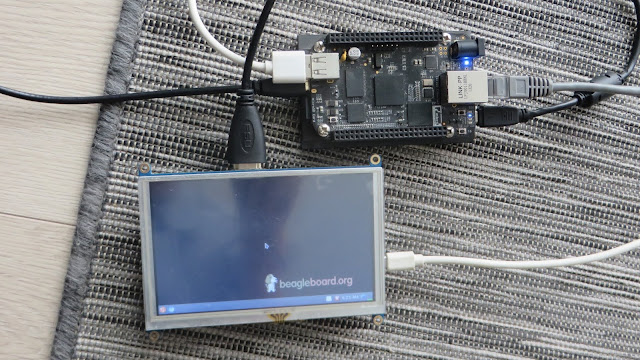
To no-one's surprise, you are greeted by a glitchey black screen decorated by occasionally repeating horizontal streaks of white, with a blinking underscore during boot-up and something that resembles mouse pointer later:
3) Log in to BBB - either over SSH or serial connection. The default user is debian, with password temppwd.
4) Every clone of this type of display makes it work on Raspberry Pi by taking a vanilla Raspbian image and launching LCD5-show script from LCD-show GIT repository. By repeating what's listed in that script on Beagle Bone, we'll achieve the same goal here.
First off, we specify the resolution and refresh rate of HDMI screen manually. If we were to look into dmesg logs, we'd see this message: tda998x 0-0070: read edid timeout.
EDID specifies the capabilities of display devices (i.e. what resolutions they can display) - and evidently the engineers behind this display decided to cut corners by not implementing EDID protocol.
Voila! After rebooting you'll see a friendly beagle muzzle peering at you from the screen.
You may stop here if it's just the screen you're after. If you'd like to make use of touchscreen as well, please proceed to the next section.

Now the touchscreen is working, but it's not calibrated yet! You'll feel a certain disconnect between the point on the screen you're poking at and the actual pointer position.
1) Make keyboard pop up upon entering input fields.
2) Add virtual keyboard to autostart list.

At this point, I consider the job done and Waveshare display fully configured and usable.
Want to avoid the hassle of configuring a stock image? Download my Debian 9.1 image with all aforementioned modifications!
Just flashing it on a memory card should get you up and running in no time.

Plugging USB cord back into BeagleBone's USB host solved the issue.
Eventually BB maintainers deprecated Kernel overlays in favor of U-Boot overlays. DTBs are loaded at boot time in newer Debian versions, so attempting to load DTBs like you used to has no effect:
Everything device-tree related is now described in /boot/uEnv.txt now, so please follow the code snippet above to find out how to do that in modern BBB Debian distributions.

|

|
| Front | Back |
The catch is, manufacturer promises that this display is directly supported on Raspberry Pi (actually, Raspberry Pi 2 and later because of the location of HDMI connector), but the only single-board computer I had at hand was BeagleBone Black.
Well, I thought, judging by the look of it, the display receives its feed over HDMI, and I don't really want touchscreen capability, so how hard can it be?
Things to be aware of:
- There are 2 versions of this display: with touch interface working over GPIO and USB. If you see one microUSB connector on the board - it's GPIO, otherwise it's two for USB.
- Touchscreen is a resistive kind, meaning you'll have to calibrate it before first use.
Some helpful resources on the display:
- Product pages (original and clones)
- Waveshare 5inch HDMI LCD (B)
- Elecrow. HDMI Interface 5 Inch 800x480 TFT Display
- Spotpear Raspberry Pi 5inch HDMI LCD GPIO Touch
- Miscellaneous (usually more helpful than product pages from tech perspective😀)
- LCD-show script GitHub repo
- Adding XPT2046 ( ADS7846 ) Touchscreen Support to Beaglebone Black
- Stackoverflow: preprocessing DTS files before compiling
- BBB device tree (some of it is already obsolete)
- Force Beaglebone Black HDMI resolution
You'll need:
- HDMI to miniHDMI cable [link]
- microSD memory card, 4Gb min. BeagleBone Black ships with 4Gb of eMMC memory on-board, that's why all OS images tend to fit into that space. You can actually make it work with 2Gb - older versions of BBB had only that much - but it'll require some elbow grease. Further reading: [link1] [link2] [link3]
- Beagle Bone Black with a 5V 2A power supply. Plus either a USB to mini-USB cable or a 5.5/2.1 mm. barrel jack connector to power it up, whichever is easiest to procure for you.
- Some way to get console access to BBB. If you have a WiFi router at home (of course you do) the simplest option would be to grab an Ethernet cable and patch BBB to the router, making BeagleBone a part of your local network, then SSH into it.
- Evidently, the display in question [link]
Connections:

|

|
| They say a picture is worth a thousand words. May not be as true for connection listings, but I'll at least try. |
Close-up with touchscreen GPIO connections |
 |
| Did you know that you can left-click on any picture to expand it? |
| BeagleBone | Display |
| USB Host | micro USB |
| miniHDMI | HDMI |
Quite simple, isn't it? Actually, you'll need to make some more connections to make touchscreen work:
| BeagleBone | BB pin header and no. | Display |
| SPI0_D0 | P9 Pin 21 | MOSI |
| SPI0_D1 | P9 Pin 18 | MISO |
| SPI0_SCLK | P9 Pin 22 | SCK |
| SPI0_CS0 | P9 Pin 17 | CE1 |
| P9 Pin 23 | P9 Pin 23 | P6 |
| DGND (optional) | P9 pins 1, 2, 43 - 46 P8 pins 1, 2 |
GND (optional) |
Note that we're just powering the display via micro USB, therefore you can hook it to any other 5V power supply (e.g. another wall charger) if you're saving USB host connector on BBB for later. If this other power supply happens to be isolated from main BBB power source, make sure to join the ground terminals as shown in table above.
Enabling the display
1) If you're not sure what's installed on your Beagle Bone, follow the official guide and install the latest Debian image with LXQT first. Note: on the older revisions with only 2Gb eMMC, the newest image that worked for me was Debian 9.1 2017-08-31 4GB SD LXQT.2) Power up the board, while holding down the "Boot" button:

You can release it when all 4 LEDs lit up. Now you've essentially told BeagleBone to boot from memory card instead of eMMC memory, up until power cycle (and only that! When you press "Reset" button it will still boot from SD, whether you hold "Boot" button again or not).
To no-one's surprise, you are greeted by a glitchey black screen decorated by occasionally repeating horizontal streaks of white, with a blinking underscore during boot-up and something that resembles mouse pointer later:

|

|
| Booting sequence on unmodified Debian LXDE image | Idle X window after boot-up. All black except a grainy artifact that is a mouse pointer. |
3) Log in to BBB - either over SSH or serial connection. The default user is debian, with password temppwd.
4) Every clone of this type of display makes it work on Raspberry Pi by taking a vanilla Raspbian image and launching LCD5-show script from LCD-show GIT repository. By repeating what's listed in that script on Beagle Bone, we'll achieve the same goal here.
First off, we specify the resolution and refresh rate of HDMI screen manually. If we were to look into dmesg logs, we'd see this message: tda998x 0-0070: read edid timeout.
EDID specifies the capabilities of display devices (i.e. what resolutions they can display) - and evidently the engineers behind this display decided to cut corners by not implementing EDID protocol.
Voila! After rebooting you'll see a friendly beagle muzzle peering at you from the screen.

You may stop here if it's just the screen you're after. If you'd like to make use of touchscreen as well, please proceed to the next section.
Bonus section: setting up touchscreen, calibration, on-screen keyboard
Touchscreen
Luckily for us, some guy had already figured out how to enable touchscreen on Waveshare displays. I'll just duplicate his findings here in case that website goes down. [BB-ADS7846-00A0.dts on my Google Drive]
Now the touchscreen is working, but it's not calibrated yet! You'll feel a certain disconnect between the point on the screen you're poking at and the actual pointer position.
Calibration
Virtual keyboard
... and that was it! Just kidding, to make it usable we'll have to do the following:1) Make keyboard pop up upon entering input fields.

|

|
| Menu->Universal Accessibility->Florence Virtual Keyboard. Then click the wrench button. | Tick the "Auto hide" option. |

|

|
| Menu->Preferences->LXQt Settings->Sessions Settings | Your autostart list should look like that. |

At this point, I consider the job done and Waveshare display fully configured and usable.
Want to avoid the hassle of configuring a stock image? Download my Debian 9.1 image with all aforementioned modifications!
Just flashing it on a memory card should get you up and running in no time.
Commonly encountered problems
- Noisy picture, horizontal white stripes.

Plugging USB cord back into BeagleBone's USB host solved the issue.
- Can not get touchscreen to work - DTB is not inserted after reboot.
Eventually BB maintainers deprecated Kernel overlays in favor of U-Boot overlays. DTBs are loaded at boot time in newer Debian versions, so attempting to load DTBs like you used to has no effect:
Everything device-tree related is now described in /boot/uEnv.txt now, so please follow the code snippet above to find out how to do that in modern BBB Debian distributions.
Hi,
ReplyDeleteHow we develop a GUI using this Wavshare display on Beaglebone black? Which technology and language would be the best option? Any tutorials available for a newbie?
Whichever you're most comfortable with! I mean, as you've finished this tutorial you basically have an ordinary computer with a display, no architecture-specific tricks attached.
DeleteActually right now I'm developing some visualisations for BBB with this display using Python's matplotlib. Direct outcome of BBB being a computer with Linux is that I just develop the code on my laptop, then transfer it to BBB via scp and it just works in the same way as on the laptop.
Hey!
DeleteAs I mentioned before, I'm working on a project that is similar to what you wanted to accomplish, from development perspective. That is, the code is running on a single-board computer (Raspberry PI, BeagleBone) but I'm developing it on my machine.
The code is not even close to completion, but I've committed a working setup with scripts that let me develop locally, then copy and run Python code on SBC. Hoping you'll find some new ideas in there:
https://github.com/panovvv/comparative-air-pollution-sensor
Vadim.
Follow up: look under /code/hub, it contains my setup with scripts and all.
DeleteHi,
ReplyDeleteThanks for your reply.If so can I develop an interface using Java on a PC and port it to BBB?Which IDE is to be used for development using Java? I am familiar with only C#.net, But C# being Windows based, I don't think we can use it with BBB. Am I right?
Probably yes, Java being a cross-platform language. I would give it a shot :) Make sure to see if the features you're using are cross-platform though (I wouldn't use Java to manipulate BBB pins or I2c or anything hardware and specific to BBB).
DeleteI'd recommend Intellij IDEA as an IDE, but the specifics of moving the app to target board are for you to figure out - never done that with Java. On Python I just invoke a script that copies the sources over via scp and runs Python on them via ssh.
Thank you so much. I am not familiar with scp or ssh.Python is also new to me.So I believe,you develop a GUI for BBB using Python with matplotlib on a normal laptop and and transfer using scp .Will do some study and get back to you probably in few weeks. :)
DeleteYou had mentioned -"I wouldn't use Java to manipulate BBB pins or I2c or anything hardware and specific to BBB.". Could you explain on that?I mean how can one access a BB pin using python or Java.
ReplyDeleteI'm in the middle of this myself, so I'll avoid giving advices for now :)
DeleteBut a quick outing to google tells me that there's at least one Java library you can use to manipulate GPIO on BeagleBone: https://github.com/alamorobotics/BeagleBoneBlack-Java-GPIO
But the fact it uses Linux file manipulation under the hood tells me that it's probably no good for anything faster than a kilohertz.
Ideally, you want access to some kind of "raw" interface that lets you bitbang those pins. Linux only gives you a proxy.
I'd start by looking at how it's implemented in more widespread single board computer - raspberry pi: https://pi4j.com/1.2/example/control.html
Hi...
DeleteI am trying to start my GUI development using Python.Thought of using tkinter. But I think it does not provide a drag and drop facility.I am not sure.Can you give your suggestions?
Is there any better development tools other than tkinter for Python on Beaglebone Black that has the drag and drop facility and that can be easily used by a newbie?
I found one called "PAGE - Python Automatic GUI Generator", but not sure if this can work with Beaglebone Black.Kindly share your thoughts on PAGE too.