- Get link
- X
- Other Apps
This will be a short post showing how to make use of supercapacitors without damaging either you or supercapacitor.
Now that we have the basic warnings out of the way, let's imagine you just bought a supercapacitor and don't quite know what project to use it in. The obvious thing to do seems to be trying to charge it? Or maybe, you just want to see if it works as advertised and has the capacity of N Farad, or if it's yet another counterfeit?
Today I'll show you how to do all that having only some basic equipment. Detailed walkthrough guide below:

2) Stranded core copper wire.


5) Multimeter. Anything that can measure voltage will do. Any at all, that is. You can use an actual voltmeter if you're feeling vintage today.
2) Capacitor charge calculator - I prefer the ones that graph the result. If it just shows the numbers, I'll do those faster with a pen and a sheet of paper.
3) Circuit simulator. Paul Falstad's circuit simulator is a perfect match for simple simulations, the type we're going to run to visualize the charging process with current and voltage limiting.
Explaining why limiting the current matters (technical details, safe to skip):
Another thing you should keep in mind is non-linearity of charging process. This should click if you play around with the simulator (Select Curcuits -> Basics -> Capacitor):

Notice how the voltage starts building up quite fast, but on the final stretch volts creep up fraction by fraction:

We'll need this knowledge when we get to the actual charging process.
Also, note how due to non-linear nature of the charging process the curve is almost linear during the first 20 or so minutes, and then the process slows down gradually.
Two other noteworthy parameters are conveniently collocated in the same green window: peak charge current (this one must not exceed the figure from datasheet, 12.5 amps in my case) and peak power that resistor has to dissipate (should be within the limits of rated wattage. 2 Watts will be effortlessly dissipated in my 10 Watt resistor).
So how can we go around this non-linear limitation and speed up the charging?
Here's one trick: charging with voltage higher than what capacitor is rated for.
While applying more than the maximal voltage marked on the body damages your capacitor, you don't directly apply voltage to its terminals when you charge it. That means you can charge with any voltage, making sure to terminate when it's close to the rated voltage of your capacitor.
It's easy verify this fact using the same online calculator:

What's different from that time when we attempted using 2.7 volt power supply?
This is it. Don't leave the charged capacitor lying around. 2.7V is not enough to cause any significant current flow on skin contact, but if it accidentally touches something conductive - the poor thing will probably melt. This brings us to another, no less important part of handling supercapacitors:


Before you continue reading, I'd like to clarify that I'm not responsible in any way for any injuries or deaths caused by other people mishandling supercapacitors. Don't do this at home bla bla bla.
Now that we have the basic warnings out of the way, let's imagine you just bought a supercapacitor and don't quite know what project to use it in. The obvious thing to do seems to be trying to charge it? Or maybe, you just want to see if it works as advertised and has the capacity of N Farad, or if it's yet another counterfeit?
Today I'll show you how to do all that having only some basic equipment. Detailed walkthrough guide below:
Physical equipment we'll need:
1) Supercapacitor. I got mine here, although there are varieties of other voltages and capacities to choose from. Any will do for purposes of this tutorial.
2) Stranded core copper wire.

3) ATX Power supply. Computer power supplies continue to be the fastest and cheapest way to get plenty of current at most widespread voltages (12, 5 and 3.3 V), and as such they are used by electronics hobbyists everywhere. Refer to this post to learn how to leverage that power as simply as possible (tl;dr version: find an old ATX power supply, add a cheap board from Aliexpress).

4) Some power resistors. As to what value and power rating - I'll get to that a bit later, but to be fair I just scavenged mine from an old power supply of a printer. Almost any low value and high power dissipation resistor will do, but only after some calculations will we understand which is the most optimal (i.e. allows the fastest charge possible).
 |
| 3.6 Ohm, 10 Watt power resistor found in an old PSU. |
5) Multimeter. Anything that can measure voltage will do. Any at all, that is. You can use an actual voltmeter if you're feeling vintage today.
Virtual equipment:
1) Capacitor datasheet. My model is called Samwha Green-Cap, nominal voltage 2.7 V, capacity 500 F.2) Capacitor charge calculator - I prefer the ones that graph the result. If it just shows the numbers, I'll do those faster with a pen and a sheet of paper.
3) Circuit simulator. Paul Falstad's circuit simulator is a perfect match for simple simulations, the type we're going to run to visualize the charging process with current and voltage limiting.
Some theory
Unlike batteries, supercapacitors don't require any complicated steps to be charged. They are used exactly as you would use a capacitor - applying voltage to its terminals charges it, shorting the terminals or connecting a load discharges.
There are only two considerations related handling supercaps.
There are only two considerations related handling supercaps.
- Limiting voltage. Similarly to regular capacitors, overcharging them to more than the rated voltage will cripple them permanently - lower their capacity at the least. My capacitor is rated 2.7 volts, and to stay on the safe side I should not charge it to voltage higher than 2.5V.
- Limiting current. The second is something you rarely encounter when working with normal capacitors:

Looking at the datasheet, I can see that my cap can withstand a max. of either 12.5 or 20 Amps. I wouldn't push for more than 12.

Explaining why limiting the current matters (technical details, safe to skip):


Another thing you should keep in mind is non-linearity of charging process. This should click if you play around with the simulator (Select Curcuits -> Basics -> Capacitor):

Notice how the voltage starts building up quite fast, but on the final stretch volts creep up fraction by fraction:

We'll need this knowledge when we get to the actual charging process.
Practice time!
Let's start by grabbing whatever power resistors you had at hand and finding out charge time for some of them. For instance, I had two 3.6 Ohm resistors.
What happens if we charge my supercap with one of them is series? Let's assume that we managed to find a power supply that puts out exactly 2.7V (which can be easily accomplished with a buck converter). Plug the numbers into any online calculator and observe the result:

That's over an hour! I wouldn't want to be the guy who waits for this capacitor to charge...What happens if we charge my supercap with one of them is series? Let's assume that we managed to find a power supply that puts out exactly 2.7V (which can be easily accomplished with a buck converter). Plug the numbers into any online calculator and observe the result:
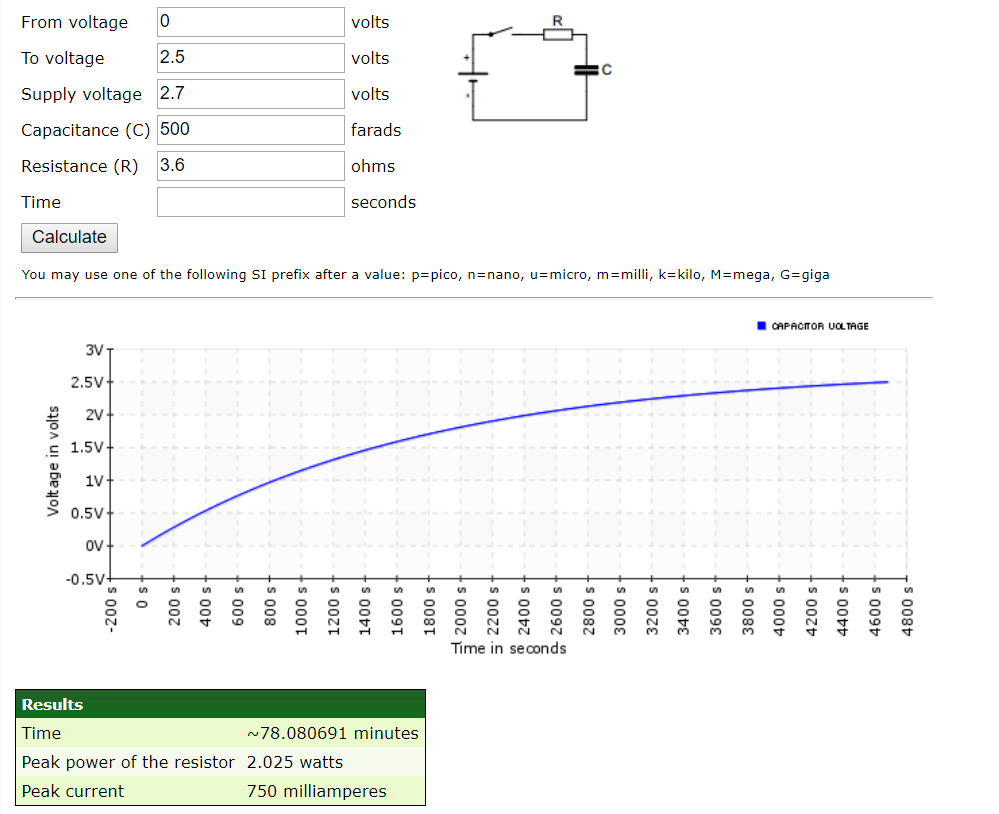
Also, note how due to non-linear nature of the charging process the curve is almost linear during the first 20 or so minutes, and then the process slows down gradually.
Two other noteworthy parameters are conveniently collocated in the same green window: peak charge current (this one must not exceed the figure from datasheet, 12.5 amps in my case) and peak power that resistor has to dissipate (should be within the limits of rated wattage. 2 Watts will be effortlessly dissipated in my 10 Watt resistor).
So how can we go around this non-linear limitation and speed up the charging?
Here's one trick: charging with voltage higher than what capacitor is rated for.
While applying more than the maximal voltage marked on the body damages your capacitor, you don't directly apply voltage to its terminals when you charge it. That means you can charge with any voltage, making sure to terminate when it's close to the rated voltage of your capacitor.

What's different from that time when we attempted using 2.7 volt power supply?
- Capacitor got charged to the same voltage 4 times faster.
- Resistor has to dissipate 3 times more power.
- Charging curve is more linear - because even at the end of charging we're nowhere close to the source voltage (5V).
Charging
- Calculate the charging profile before actually attempting it. There are two variables to play around with: current-limiting resistor and charging voltage. For instance, I'd like to charge my 2.7V 500F capacitor through the lowest resistance I had on hands: two 3.6 Ohm 10 Watt resistors in parallel (equivalent to 1.8 Ohm, can handle 20 W). ATX power supply puts out 3.3V, 5V and 12 Volts - I'll calculate all 3 scenarios (follow the links to see calculations). If I had any other power resistors, I'd calculate for those too.
- Comparing the profiles:
- 3.3V is doable (takes 21 minutes, peak resistor power 6W, peak current 1.8A while my PSU can supply 20A@3.3V),
- 5V too (10 minutes, peak power 14W which is ok for two 10-Watt resistors, max. current is 2.7A out of 30A@5V that PSU can supply),
- 12V is unrealistic (0 to charged in 3.5 minutes, will pull 6.6A out of 10A, BUT requires resistor to dissipate 80 Watts. To put things into perspective - 100 Watt consuming nichrome wire is already considered an aquarium heater).
- Pick the voltage and resistance that result in the fastest charge possible. You're only limited by the following:
- Peak current should not exceed the maximal current that your PSU can supply,
- Peak power dissipated should not exceed the power rating of your resistor,
- Charge time should not be too fast! Remember, you'll have to monitor the voltage on capacitor terminals and manually switch off the PSU to avoid overcharging. Rule of thumb is 30 seconds to full charge is the fastest charging process you can monitor, anything faster than that and you run a risk of blowing up💀.
- Connect your capacitor according to this simplest schematic, minding the polarity:


-
Connect multimeter leads to capacitor terminals. If you can fix them permanently (e.g. alligator clips) - this would be preferable.

- Turn on the power supply. Observe the voltage slowly creep towards the desired mark. Keep an eye on power resistor too - if it starts glowing red or emitting smoke you should definitely terminate - this resistor's power rating is not enough.
- When the voltage is nearing maximal rated voltage of your capacitor, turn off the power supply. In my case, I cut off at 2.5V for 2.7V capacitor.


Discharging
You have two options to choose from: fast, fun and dangerous OR safe and boring one. If I were you, I'd try the former option once just to see what it's like, but resort to the latter the rest of the time.- (Fun but unsafe) Grab a piece of stranded copper wire (not solid core!) and peel off as much insulation as you can. Separate individual hairs from one another slightly. Touch one or more copper hairs across the terminals, causing them to evaporate almost instantly.

Repeat until shorting the terminals does nothing visible to the copper hair it. This is what wire looks like after discharging capacitor once:

- (Not as fun but recommended) Connect the same resistance you used for charging across the terminals. Wait. It's ready when the voltage across terminals measures close to 0.


Measuring real capacitance
- Discharge the capacitor, then short the terminals to keep it discharged.

- Have your stopwatch prepared (or stopwatch app on your phone, it's the 21st century after all). Trigger it when you start charging.

- Charge to any voltage (the higher the more precise will our estimation be), stop the stopwatch.
- Key in the numbers into any online calculator to reverse-calculate the capacitance.


My experiment:
- 2.7V capacitor with claimed capacitance of 500 Farad.
- Charged from 0 to 1.5V in 3 minutes 39 seconds:

- Typing these numbers into the calculator will yield.... 340 Farads!

Hello friend I have a DC power supply that can do 5v and 2.5A max, this is more lower that your pc power supply that give to you 20A . Then, I have to use the same resistors???
ReplyDeleteThis regulable power supply.
https://es.aliexpress.com/item/32294852872.html?spm=a2g0s.9042311.0.0.274263c0xtW1z6
Thanks.
You cannot measure the capacity of a SC like that. You can see a SC as the electrical model of cascaded, series-connected RC (resistor/capacitor). The resistance increase while the charge penetrate deep inside the SC. If you charge a SC fast, once you reach the target voltage, you will observe a decrease of the voltage when you stop charging.
ReplyDeleteYou can see this like a bottle connected to a second bottle with a pipe in the bottom and a third bottle connected to the second and so on. You can only fill, empty and measure the first bottle. If you fill the first bottle very fast, you will see it full very fast but the liquid will flow thru the bottom tube to the other bottles and you will see the level decrease. The size of the pipe represent the internal resistance.
There is also a leak current that will slowly empty the SC but you can measure it only once the charge is completly distributed inside the SC (could take from hours to days).
I'm a non- electrical student. i have a doubt that what happens if i charge the same capacitor with same procedure, with same arrangement except the "resistors"? that is phase and ground going directly to the terminals of the capacitor??
ReplyDelete