- Get link
- X
- Other Apps

Part 2 is here
Foreword
IoT, the buzzword of this decade, sometimes enters even the minds of people considering themselves resistant to fad, with me among them.One day I was browsing the Internet and saw a company I've never heard of before (Hologram) give away SIM cards for free, with stated intent of promoting IoT among hardware developers. I looked into the deal and it seemed too good to be true - SIM card with 1Mb worth of GPRS data for free, and with free shipping as well - this kind of generosity is usually manifested by huge companies. That got me thinking: why not order one?, even though, as I mentioned, I'm not really into IoT. So I did.
Fast forward a couple of months, Hologram SIM is gathering dust in my drawer, but a vague idea somehow connected with it has started coursing the fringes of my consciousness - what if this free 1Mb/month plan could be used in a clever way without ever paying for extra data?
Let's assume the worst case scenario - month is 31 days long, and when they say 'megabyte' they mean 1 000 Kb or 1 000 000 bytes (as opposed to MiB), and that leaves us free to use 32.258 Kb, or 32258 bytes a day. That figure looks realistic for, say, some kind of remote sensor that will push measurements to server once a day.
With that doubt swept away with a quick calculation, a new plan was formed - combine Hologram SIM card with some inexpensive 2G module to make way for remote sensors on the budget.
SIM900A - inexpensive module for Asian market
Over the past years I had already worked with the cheapest 2G module on the market , namely Neoway M590. As a result, it's already well documented on this blog in a popular series of posts (post one, two and three). In short, these modules' lack of reliability is the deal breaker. That's why I (quite predictably) set out to find the second-to-last of inexpensive 2G modules on the market.The search is complete, and I give you - SIM900A:
 |
| Pinout diagram is usually nowhere to be found when you buy these modules, so I made one myself. |
Some essential documents that you'll definitely need:
What I failed to take into account was that the variety of SIM900 marked with letter 'A' is locked for Asian market. That means you won't be able to use those outside of Asia without reflashing them.
Also, take a look at this GSM coverage map before even buying the module, as SIM900A is a dual band module, meaning it only works on 900 and 1800 MHz bands frequency bands (see explanation here). Therefore, if your country already phased out 2G in favor of 3G and 4G, SIM900A probably won't work (although Hologram claims worldwide coverage, so I'm not really sure).
Detailed instructions on getting this module ready for battery-powered remote sensor:
Step 1) Remove the diode.
The module in question is marketed as "5V compliant". Don't hurry to hook it up to Arduino though, because what overseas marketing team means by that is not what you think it is. As stated in datasheet, SIM900 can boast power supply range of 3.4 to 4.5V (with absolute maximum of 5.5V).To enforce the limit of 4.5V this board adds (guess what!) a diode in series with Vcc pin, thus limiting the voltage to 5V - one diode drop ≈ 4.3V. Rx pin, though, is not protected at all, not even a resistive divider, so I suggest desoldering the diode and switching to 3.3V entirely:
 |
| Solder bridge in place of diode - now it's completely 3.3V. |
For testing and reflashing I've been using Arduino Uno modified for 3.3V operation (how to make one out of normal Uno), and it's one of the few things you'll need, pictured below:
 |
| 3.3V Uno, Sim900A and a lithium battery. |
Step 2) Check if your module works where you live.
Also, determine the baud rate and flash size of your module while you're at it.SIM900 supports autobauding feature. This means that your module will automatically determine baud rate based on your input. How's your module configured - autobauding or some certain speed? First off, even datasheet provides self-contradicting information on that, and even if it wasn't you've quite likely been sent used module:
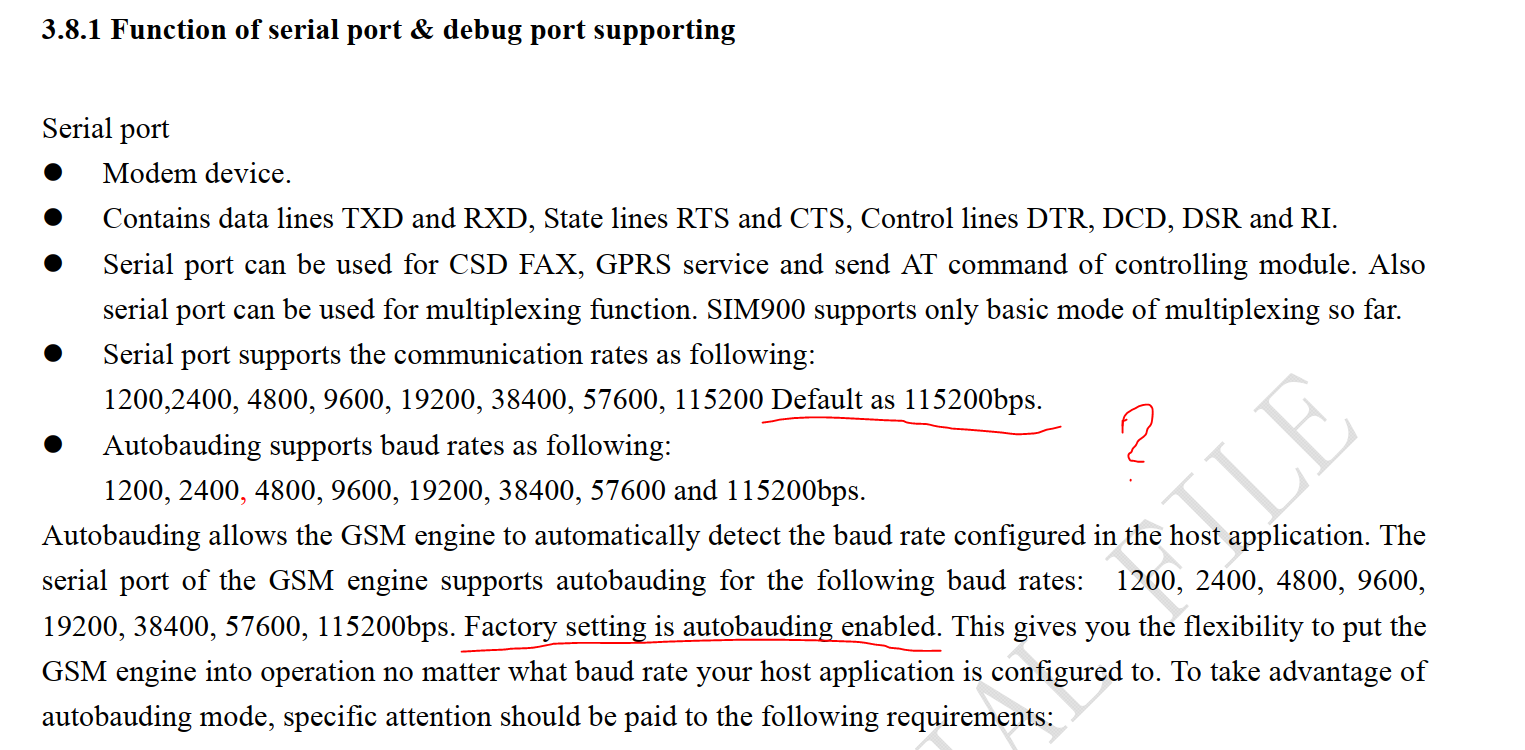 |
| What? |
Please feel free to use my old trusty Arduino sketch to do both baud rate and flash size determination:
Connect all the hardware as follows and upload the sketch:


With all that taken care of, you can finally check the essential info about your module. As you can see on screenshot below, my module was configured to 115200 baud, because of garbled output on other speeds.
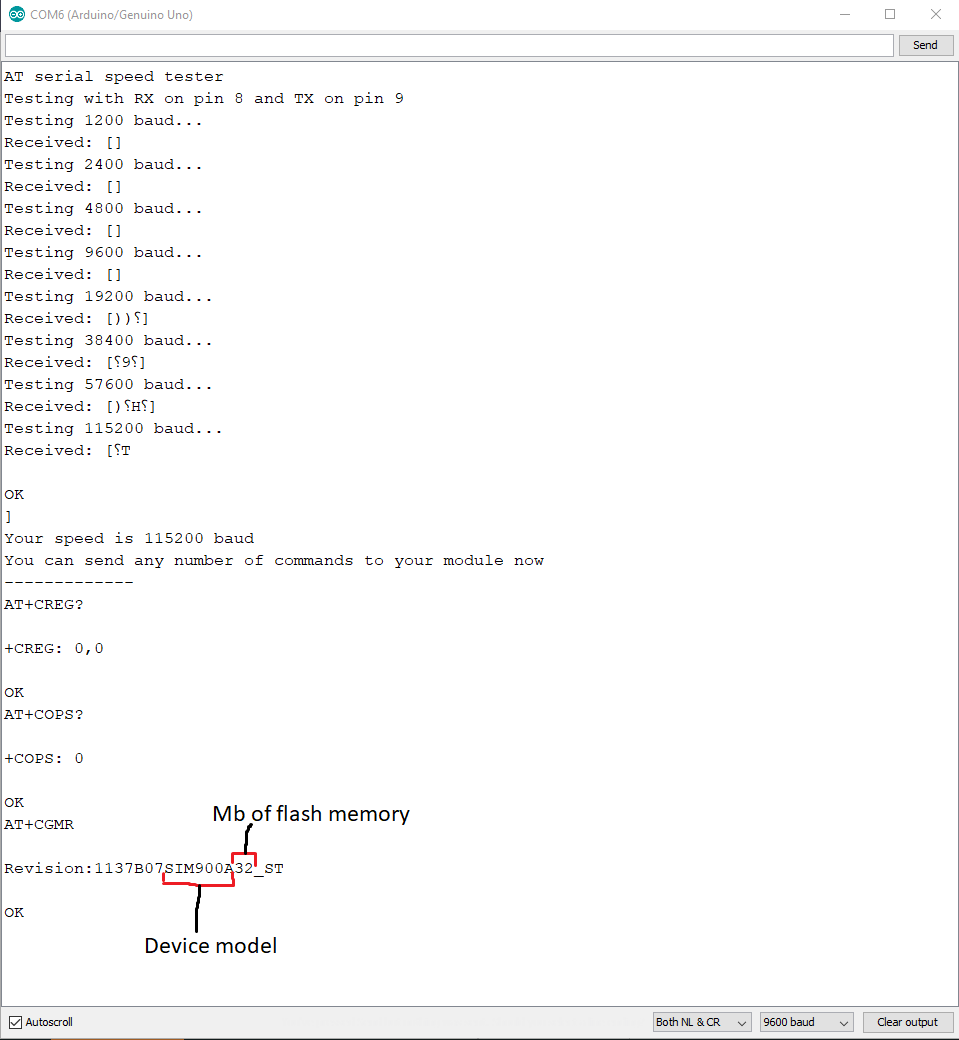 |
| After the baud rate is detected, you can enter any number of AT commands. |
Note that you can't tell if autobauding is enabled or not with just automatic recognition feature of my sketch - with autobauding enabled, the module should start working at any baud rate you'll first transmit data at (to be exact, it listens to capital 'A' because every AT command starts with A. Won't work with small 'a' though).
 |
| After activating autobauding, this sketch may "detect" any speed, because module works with any speed you use for first transmission. |
AT+IPR? command will show you the real baud rate (0 stands for autobauding). I recommend setting baud rate to a concrete value with AT+IPR=baudrate , preferably not too low - the firmware reupload, for instance, will take about an hour at 9600! My favorite setting is 115200 baud - good for all purposes.
After finding out about baud rate, here are 3 essential commands you should enter to know if you need new firmware or not:
- AT+CREG?
Request network registration status. +CREG: 0,0 in response means you SIM isn't even registered in network - skip to command number three in this case. When your module spits out something different than 0,0 (e.g. +CREG: 0,5) you won't need any firmware reflashing - execute the next command to see which cell network you're connected to. - AT+COPS?
Get network name. You'll see +COPS: 0 for unregistered SIM, or something like +COPS: 0,0,"TELE2" for registered SIM. Again, you don't have to flash new firmware if your SIM can already operate in your region. - AT+CMGR
Get firmware version. That's the way to tell the flash size of your module. SIM900 come in two varieties: 32Mb and 64Mb flash memory. Firmware is also tailored for each model (e.g. SIM900, SIM900A, SIM900B).
An example firmware version string.

Revision:1137B13SIM900A64_ST
, while 32Mb module usually responds with
Revision:1137B12SIM900A32_ST
What's common in these is SIM900A line denoting the fact that these fiirmwares will only work in certain countries, although hardware-wise these models are the same thing. By reflashing we will trick SIM900A to operate like another model.
After reflashing, your 64Mb module becomes SIM900M:
Revision:1137B02SIM900M64_ST_ENHANCE
,and 32Mb module becomes SIM900B:
Revision:1137B09SIM900B32_ST
As you might have noticed, new 64Mb firmware sports 'ENHANCE' label, which adds the following features:
Well, now that we're done with the specifics of firmware versions and baud rates, and provided your SIM900 refused to register your SIM card in 2G network - it's time for an upgrade!
Step 3) Reflash the module.
I've tried following numerous instructions from different sources (most of them implying the module has POWER_KEY pin connected to onboard button, although my module lacks it), yet the only successfull approach to reflashing SIM900A I found out myself through trial and error.I hope you already followed step 2 and know both baud rate and flash size of your module.
How to unlock SIM900A module to work outside of Asia:
- Connect your PC to SIM900A with any USB-to-Serial converter - I'm using the same Arduino Uno sans the chip due to the fact that it already 3.3V throughout. See connection diagram and picture below:


- Make sure the module responds to AT command (personally, I mix up RX and TX all the time).
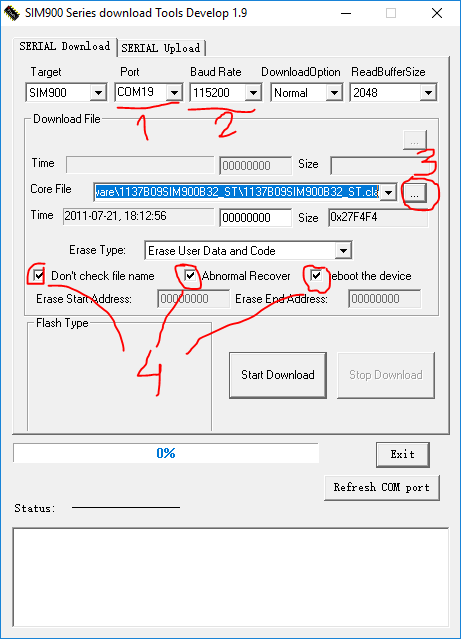
- Download this archive containing flashing software v1.9 and firmware files for both 32 and 64Mb.I tried the older version (v. 1.01) first but every attempt ended with "Err 307 - Error during change baud rate" error and there was nothing to tweak there:

-
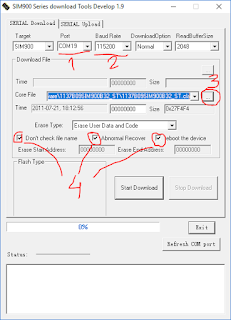
Pick the firmware according to your flash size (you won't be able to upload the wrong firmware, don't worry about that) and baud rate (for module with automatic baud rate setting you can pick any value from the dropdown). Important: Tick all the options: Dont check file name, Abnormal recover and Reboot the device!
- Unplug positive wire from the module. Press "Start download" and plug it back in.
-
When 'Resetting module now, please wait' shows up, connect the wire back to module's Vcc contact. This might take a few times, because sometimes the program won't wait for the module to give any signs of life at all, happily flashing bytes into nothingness. When it happens, stop the uploading, and repeat starting at the previous step.

-
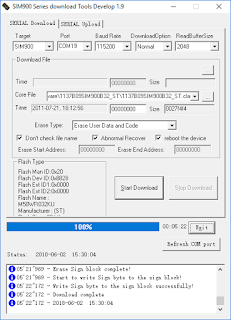
Wait for the process to finish - it will take about 2 minutes at 115200 baud.

- It's finished! After that you'll only have to cut the power to module in order to restart it.


End of part 1
This concludes part one of my ongoing project. There's also part 2, where I'll show you how to register and make use of your Hologram SIM and even publish some sensor readings to Thingspeak:
|

|
Comments
Post a Comment