- Get link
- X
- Other Apps
Recently I've decided to venture into an exciting world of homebrewing. Brewing your own beer mostly involves 2 types of manipulations with liquids, namely heating and cooling. While heating can be comparatively easily done with butane burner or electric heater, cooling is a slightly more complicated matter. There are several ways one can go about cooling his/her wort:
Since I was always fascinated with new technology, soon enough a thought came to my mind that Peltier elements are begging to be used in this scenario of cooling a limited volumes of liquid. Thus I resolved to try making something like an immersion chiller with finite reserve of water cooled by Peltier modules.
This blog post is meant for those poor souls who, like myself, don't even have access to a steady source of tap water on their brew day.
I started my experiments by buying
From all this stuff we can fashion a sort of heat exchanging sandwich. It'll look like that:
As it turned out later, you can buy a DIY-kit instead of buying those separately:

Obviously, cold side of TEC element goes to the heat exchanger, while the hot side goes to CPU heatsink with fan.
Now, I wonder if this will even work... And if it does, how much current will this 1-sandwich setup pull? Let's try a basic arrangement where the pump gets water from the bucket, pumps it through our heat exchanger and back into the same bucket. Hose will be connected like this:


Now, this calls for a small investigation. I'm going to do some benchmark tests to determine if cooling water via Peltier modules is viable for my scenario and how much power and TEC modules is required to cool hot wort in volumes and time frames that brewing requires (around 30L from 100°C to 25°C in no more that 40-50 minutes).
Since 1-sandwich setup was nigh useless, I continued benchmarking with 2-sandwich setup:

The results are below:
What can we gather from this data?
This looks hopeless, but now my curiosity is piqued by purely experimental side of this. Which factors affect cooling efficiency? Is there corelation between the temperature of liquid at which cooling starts and efficiency? Or maybe there's some other X factor I'm not seeing right now? Let's find out!
Since scalability was confirmed by my previous tests, I decided to go on with at least 4 sandwiches. Let's start making more of them, with thermal glue now. It's hard to work with more than two of those heat exchangers when they're just lying around. To affix them to an enclosure, you're going to need some standoffs:
Rinse and repeat. When there's enough of them, put them in some nice-looking enclosure.
This time, initial conditions for measurements will be designed to take into account things like different initial temperature and different volumes of water.
- Ice bath. As primitive as dropping your vat of wort in a sink or tub filled with mixture of ice and water. Impractical for bigger volumes and brew pots that you can't even lift. May be a great way to exercise for a rare combination of DIY brewer and weightlifter.

Ice bath
- Immersion chiller. A coil of copper through which cold mains water flows. You submerge it in your brew tank and magic happens.

Immersion chiller
- Counterflow chiller. This one is similar to the previous variety except it's built as a coil within coil. Now you don't have to sterilize your copper coil and submerge it in wort. Inner coil is for hot wort that is recirculated until it's cool enough, outer coil is fed with mains water supply.

Counterflow chiller
- Plate chiller. Basically it's a compact version of counterflow chiller where heat exchange takes place in plates instead of coils.

Plate chiller


Since I was always fascinated with new technology, soon enough a thought came to my mind that Peltier elements are begging to be used in this scenario of cooling a limited volumes of liquid. Thus I resolved to try making something like an immersion chiller with finite reserve of water cooled by Peltier modules.
This blog post is meant for those poor souls who, like myself, don't even have access to a steady source of tap water on their brew day.
I started my experiments by buying
- Two 40x40mm TEC modules (you can buy them individually or in bundles of 5 or 10 pcs),

- One aluminum heat exchanger,

- One 12v diaphragm pump,

- Flexible tubing ID 6m for pump,
- Flexible tubing ID 8m for heat exchangers,

- Thermal paste (considering that heatsinks and peltier modules don't have any mounting holes, you'd be better off with thermal glue),
- The only component left can be salvaged in the course of your usual dumpster dive - huge heatsinks , the variety used for cooling CPUs in computers. The bigger, the better.


 |
| All parts ready to be assembled! |
 |
 |
| My first attempt | My latest attempt, using thermal glue and beefier heatsinks. Looks marginally better. |
As it turned out later, you can buy a DIY-kit instead of buying those separately:
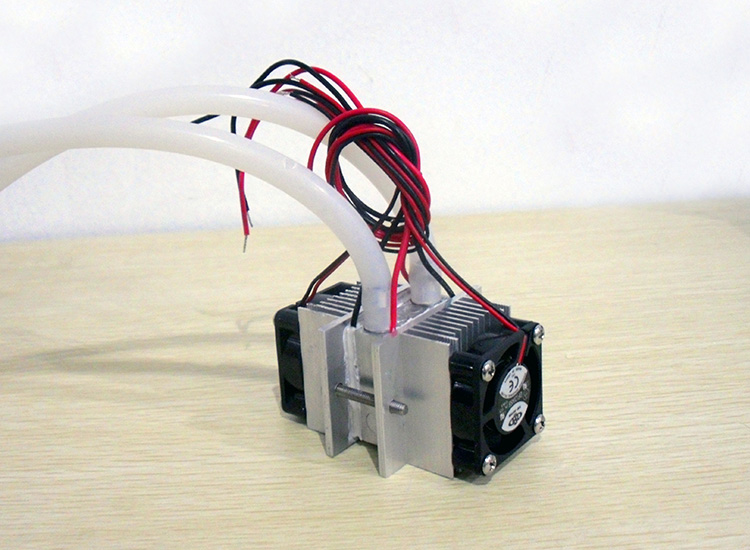
Obviously, cold side of TEC element goes to the heat exchanger, while the hot side goes to CPU heatsink with fan.
Now, I wonder if this will even work... And if it does, how much current will this 1-sandwich setup pull? Let's try a basic arrangement where the pump gets water from the bucket, pumps it through our heat exchanger and back into the same bucket. Hose will be connected like this:

And here's the whole setup:

Hook it up to 12V (I recommend computer power supply. You can even make a bench PSU out of it, see my other blog post) and if your wires haven't started smoking due to the fact that a TEC module consumes about 5A (two of them - 10A), you will see water actually cooling down! The speed at which it'll cool is awful though. After ten minutes of cooling 1/10th of a bucket the temperature dropped about 2 and a half degrees:
|
|


Now, this calls for a small investigation. I'm going to do some benchmark tests to determine if cooling water via Peltier modules is viable for my scenario and how much power and TEC modules is required to cool hot wort in volumes and time frames that brewing requires (around 30L from 100°C to 25°C in no more that 40-50 minutes).
Since 1-sandwich setup was nigh useless, I continued benchmarking with 2-sandwich setup:

The results are below:
| # Modules | Total current | Water volume | Start temp. °C | Final temp. °C | Temp. diff. | Time |
|---|---|---|---|---|---|---|
| 1 | ≈10A | 1 L | 22.2 | 19.5 | 2.7 | 10m |
| 1 | ≈10A | 1 L | 19.5 | 18.1 | 1.4 | 10m |
| 1 | ≈10A | 1 L | 18.1 | 17.5 | .6 | 10m |
| 2 | ≈20A | 1 L | 25.8 | 21.2 | 4.6 | 10m |
| 2 | ≈20A | 1 L | 21.2 | 18.7 | 2.5 | 10m |
What can we gather from this data?
- Measurements 1 to 3 and 4-5 were taken consecutively, and decrease in cooling efficiency is noticeable. In fact, it drops to half its previous value each 10 minutes, it would seem, due to insufficient heat dissipation from heatsinks.
- Positive remarks include the fact that cooling efficiency increases almost proportionally to scaling (2.7°C on 1-sandwich setup vs 4.6°C on 2-sandwich).
- Power consumption is enormous. I'd do better if I'd just buy a used fridge and use it instead.
This looks hopeless, but now my curiosity is piqued by purely experimental side of this. Which factors affect cooling efficiency? Is there corelation between the temperature of liquid at which cooling starts and efficiency? Or maybe there's some other X factor I'm not seeing right now? Let's find out!
Since scalability was confirmed by my previous tests, I decided to go on with at least 4 sandwiches. Let's start making more of them, with thermal glue now. It's hard to work with more than two of those heat exchangers when they're just lying around. To affix them to an enclosure, you're going to need some standoffs:
 |
| 30mm-long metric standoffs is what I had on hand. |
- Glue TEC modules to heat exchanger first. Leave those overnight to dry at this stage, otherwise you might end up with water cooler and peltiers misaligned against each other:


- Glue heatsinks to previous step's result, wait overnight again (drying probably doesn't take that long, but it was the most convenient plan for me).
Add PB and jellyScrew in your standoffs and your sandwich is ready.
All ready!
- Connect your sandwich to 12v once you've glued everything together to check if it works. Insides of heat exchanger should start cooling down. In my case (ambient temperature around 25°C) it cooled to -3°C, but lost some cold to room around it once heatsinks heated up, settling on equilibrium of -2.2°C.

 |
| Testing your new heat exchanger. Note water droplets condensing from air on aluminum body. |
Rinse and repeat. When there's enough of them, put them in some nice-looking enclosure.
This time, initial conditions for measurements will be designed to take into account things like different initial temperature and different volumes of water.
| # Modules | Total current | Water volume | Start temp. °C | Final temp. °C | Temp. diff. | Time |
|---|---|---|---|---|---|---|
| 4 | ≈40A | 1 L | 10m | |||
| 4 | ≈40A | 10m | ||||
| 4 | ≈40A | 10m | ||||
| 4 | ≈40A | 10m | ||||
| 4 | ≈40A | 10m |
Can you PLEASE GIVE US AN UPODATE!
ReplyDeleteI've abandoned this project because the energy efficiency was too low and the cost of providing the same level of cooling as a small fridge would be exorbitant.
DeleteSince I had a specific use case for that in mind (wort cooling) I personally settled for a second-hand fridge + copper pipe coil running through it with pump for circulation.